• Skip to main content
  • Skip to primary sidebar
  • Skip to footer

Savory Lotus

simple clean eats + healthy treats

  • About
  • Recipes
  • Healthy Living
  • Resources
  • Safe Skincare
    • BEAUTYCOUNTER
    • PRIMALLY PURE
  • MEAL PLANS

By Katja Heino 7 Comments
Savory Lotus may receive commissions from purchases made through links in this post.

How to Quickly Ripen Bananas

How-to-Quickly-Ripen-Bananas-savorylotus.com_

Baking is an impulsive thing for me most of the time.  I never know when I’m going to be in the mood to make some banana bread or strawberry banana muffins. Have you ever found yourself with bananas that just aren’t ripe enough?  It happened to me just the other day.  But now I have just the solution for this annoying little baking dilemma: How to Quickly Ripen Bananas.

How did I discover this amazing little trick?  GOOGLE, of course.  It’s what I do when I want to know anything these days.  I have found myself many times wishing that my bananas were just a titch more ripe.  It really doesn’t work to bake with bananas that are not overly-ripe. This is the original post that I got the idea from.

Let me start off by saying that there are really 2 ways to speed up the ripening of your bananas:  the 24-48 hour way and the 30-40 minute way.  I guess it all depends on how fast you want to make those muffins.

Please note that these methods WILL NOT work with super green bananas.

Method #1

For those of you who just are into planning, this method is for you.  You may want to make some banana bread in the next day or so.  Here’s what you do:

Place your bananas in a brown paper bag and seal it the best you can.  Wait 24-48 hours and you will see a a marked increase in ripening.

The reason this method works is that some fruits like bananas, apples, tomatoes, and pears all produce a gas called ethylene to ripen themselves.  When you trap this gas in the brown paper bag, you increase the level of ethylene, therefore increasing the speed of ripening.  Super simple.

You can add a tomato, apple, or pear to your bananas in the brown paper bag to further increase your ripening speed as all of these fruits produce increasing levels of ethylene as they ripen.  Be aware that everything in the bag will ripen more quickly.

Method #2

This method is for more impulsive bakers like myself.  You want to make those muffins like RIGHT NOW!  No problem.  Here’s what you do:

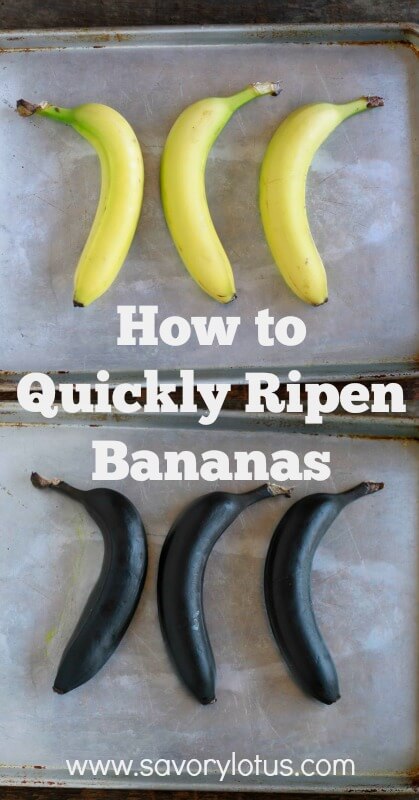
Preheat your oven to 300’F.   Place your separated bananas on a large baking sheet.  Don’t crowd them.  Bake for 30-40 minutes, depending on the size of your bananas.  (I think next time I will line my pan with unbleached parchment paper as they got a little juicy.)

When you open the oven door, your bananas will be freakishly black.  That’s a good thing.  Means that they are ready to be mashed into delicious baked goods.  They should be soft to the touch.  Allow to cool slightly and carefully peel open.  Your bananas are now perfectly soft and ripe to use.  Pretty cool, huh?

OK, there you go.  No more sad faces when you find your bananas not ripe enough.  You are welcome!
signature heart

Click HERE to PIN THIS

How-to-Quickly-Ripen-Bananas-savorylotus.com_1

Need some banana recipe inspiration?

Here’s a few of my favorite grain free things to make with super ripe bananas:

  • Strawberry Banana Muffins
  • Cinnamon Chocolate Swirl Banana Bread
  • Coconut Flour Banana Bread
  • Coffee Cake Banana Bread
  • Paleo Banana Bread
  • Grain Free Banana Waffles
  • Banana Bread Pudding

As an Amazon Associate I earn from qualifying purchases.

Posts you might also like

Filed Under: Healthy Living Tagged With: bananas, cooking tips

Reader Interactions

Comments

  1. Katie Hamilton says

    August 2, 2014 at 8:02 am

    I am ALWAYS wishing my semi-ripe or yellow, but not brown-spotted bananas were at that peak yellow-and-brown-spotted ripe spot! I found this post via Pinterest (yay, Pinterest!!) but was at first EXTREMELY skeptical as to whether or not it was going to be an actual solution (actual process to ripen them in 30 minutes) or one that’s like “oh, ripen your bananas… A DAY or SO FASTER… when this girl wants to cook with ‘em NOW! J (what was it you said about being an impulse baker? 😉 But after reading this post, I was very pleasantly surprised! Thanks for the awesome info and way-to-go!
    PS Those recipe links you included sound SCRUMPTIOUS!

    Reply
  2. Mindi says

    February 2, 2015 at 5:19 pm

    I tried this and my bananas taste terrible!! Do they have to be used immediately?? Maybe I let them sit too long? They taste like a burned green banana.

    Reply
    • Katja says

      February 5, 2015 at 10:51 am

      Hi, there!
      I have used this method quite a few times with good success. The bananas taste perfect in my baked goods. I am wondering if you used super green bananas. Did you see my note at the bottom that this will not work with super green bananas. There does have to be some yellow on them. And I do tend to use them soon after doing this. Hope that helps.

      Reply
  3. Beth says

    June 4, 2017 at 1:22 pm

    What do you do with the water goo that you see when you peel them? Drain it? Use it?

    Reply
    • Katja Heino says

      June 5, 2017 at 8:05 pm

      I haven’t noticed that mine are watery. But you could definitely use that banana goodness.

      Reply
  4. Tina says

    February 12, 2020 at 6:13 pm

    I saw a google website and they said to cook bananas for 60 minutes at 300°. U say 30 minutes. Also, I crowed them on the pan. What will over crowding do to the banana? I have 3 banana bread loaves to cook and cooked 11 bananas…. are they burnt, should I bother using these bananas? Please advise. Thank u so much.
    Tina

    Reply
    • Katja Heino says

      February 18, 2020 at 12:21 pm

      HI, Tina. Without seeing what you have going on, I cannot say if your bananas are good or not. Do they look/smell burned?

      Reply

Leave a Reply Cancel reply

Your email address will not be published. Required fields are marked *

This site uses Akismet to reduce spam. Learn how your comment data is processed.

Primary Sidebar

Hi I’m Katja!

And this is how we do healthy in our family. Just REAL food. Simple. Easy. Gluten free. More about Savory Lotus

Follow Me on Instagram

making LOADED BREAKFAST MUFFINS • packed full of making LOADED BREAKFAST MUFFINS • packed full of all the good things 🍏🥕🥥• all real food ingredients • no gluten or refined sugars • loaded with protein, fiber, and a ridiculous amount of essential vitamins and minerals • and they freeze very well for easy an breakfast or snack later on ✨✨

here’s the ⭐️stars⭐️ of this muffin show:
* carrots
* apples
* raisins
* pumpkin seeds
* sunflower seeds
* hemp seeds
* chia seeds
* coconut

recipe link in bio: https://www.savorylotus.com/loaded-breakfast-muffins-gluten-free-and-paleo/
HYDRATION 💧💧💧 👉do you drink enough wa HYDRATION 💧💧💧

👉do you drink enough water? • basic hydration is one of the building blocks of good health • and can be a simple biohack to feel better • the human body is made of about 60% water and needs adequate amounts of water to function properly • staying well hydrated ensures that our body is able to flush out toxins properly 🚽💩 • helps deliver nutrients into cells 💧 • helps regulate body temperature 🌡• keeps joints lubricated ⛹🏽‍♀️ • keeps organs functioning properly 🫀• improves brain function and mood🧠• keeps the skin looking healthy ✨✨, improves physical performance 🚴🏽‍♀️ • and so much more 

👉always choose the best quality water you can find • say NO to plastic water bottles which leach chemicals into your body and pollute the 🌎 • add a good quality salt or minerals to your water if you’ve been sweating a lot or use RO water 

👉 how much water is enough? • we are all different but a good guide is to drink 1/2 your body weight in ounces per day • so if you weigh 120 pounds, drink 60 ounces 

👉 i start my day with 32 ounces of water in the first hour i’m awake • i add a sprinkle of good sea salt to add some minerals • this routine helps my body start the day in a good way • it helps me stay on track with my water goals for the day • and feels really good 💪💧💪
hello, gorgeous 😍 • simple Nordic nut and see hello, gorgeous 😍 • simple Nordic nut and seed bread made with no flour, no yeast, no kneading, and no proofing 🍞🍞 • it’s gluten free, grain free, paleo, and keto 🙌 • made from just nuts, seeds, eggs, and oil • super versatile • reminds me of the dense whole grain rye bread I grew up eating in Finland 🇫🇮• perfect for open-faced sandwiches

recipe link in bio —> https://www.savorylotus.com/flourless-nordic-nut-and-seed-bread-gluten-free-grain-free-keto/
creating recipes is my favorite part of what i do creating recipes is my favorite part of what i do • testing out a nordic nut + seed bread 🍞🍞• no flour • no yeast • no kneading • no proofing • and just 10 minutes to prep • like a dense European/Scandinavian style loaf 🇫🇮🇫🇮 • perfect for open faced sandos • testing mine with goat cheese + sprouts • turned out so dang good • recipe coming soon ❤️
Load More... Follow Me!

Follow Me on Pinterest

Don't Miss These!

  • Everyday Gluten Free Bread (dairy free + egg free)
  • dry heels, cracked heels, how to heal, DIY Easy Home Remedy for Dry Cracked Heels
  • Simple Coconut Flour Cake (gluten free, grain free, nut free, paleo) | savorylotus.com Simple Coconut Flour Cake (gluten and grain free, paleo)
  • Simple Gluten Free Sourdough Bread

Clean Swaps

Clean Swaps

My Cookbook!

My Cookbook!

Footer

Get More Recipes on Pinterest

Visit Savory Lotus' profile on Pinterest.

Get More Recipes on Facebook

The Savory Lotus on Facebook

Stay Connected

Copyright © 2021 Savory Lotus    ·    Affiliate Disclosure     Disclaimer     Privacy Policy     Terms of Service